4. Arduino Programming
An Arduino-Program „Sketch“ consists of the „setup“ function for one time initialization during starting time and the „loop“ function for the endless loop.
4.1. Difference between Arduino and conventional C
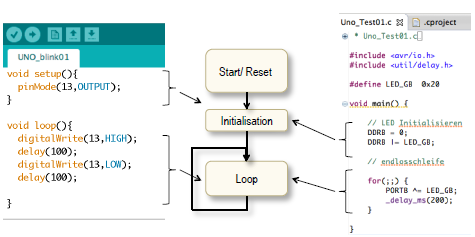
The Arduino has a minimal Operating System. The program consists of an initialization part and an endless loop. As it can be seen in the example below, the Arduino development platform encapsulates many cryptic functions and the processor code. Additionally, the Arduino code is significantly larger in size than a code written in conventional C.
4.2. Arduino vs. Microcontroller Programming
Microcontrollers can be programmed in different languages. A very hardware-related, low-level language is Assembler. It is used to create code for a specific device/ a particular computer architecture and typically selected for time or memory critical tasks.
In contrast to Assembler Arduino has a minimal Operating System and library functions to interact with the Hardware. Thus, it is portable across multiple systems (the generated code can be used for different microcontrollers). Programming of μC-Register is done with the help of the library functions. This leaves the programmer free to take care of his individual program.
4.3. Arduino basic commands
Read and Write:
To set up the PIN in (INPUT,OUTPUT) mode:
pinMode(PIN,OUTPUT);To write digital values:
digitalWrite(PIN,value);To read digital values:
value=digitalRead(PIN);To write analog values:
analogWrite(PIN,value);To read analog values:
value=analogRead(PIN);
Useful Arduino commands:
Delay of the program execution in milliseconds:
delay(1000);Start of serial communication:
Serial.begin(9600);Send data via serial interface:
Serial.println(analogRead(1));
Create own functions (example):
void blink(int thePin, int time)
{
    digitalWrite(thePin, HIGH);
    delay(time);
    digitalWrite(thePin, LOW);
    delay(time);
}

// Calling the function
blink(3, 1000);
Switch-case: Used to test if a variable is in a specific condition.
switch (myVariable)
{
    case1:
        command1;
    break;
    case2:
        command2;
    break;
    default:
        command3;
    break;
}
Note
For more information please refer to the Arduino page: https://www.arduino.cc/reference/en/
Note
For most steps Arduino examples are available in the Arduino IDE. Use these examples!