11. Tasks
The tasks below are designed to teach Version Control with VS Code and GitLab.
Hint
You can follow these tasks directly with git commands in CMD/Terminal.
11.1. Task 1
Todo
Creating a new repository on GitLab website.
Follow the steps below:
Open GitLab website ( https://git.fh-aachen.de/ )`and login in. You will see a page with all the projects in your account.
Click on New project button to create a new project. ON next page, click on Create blank project.
On the next page, enter the name of your project.
In project URL select your FH-Kennung nummer (FH identifier) (AB1234S). In Project slug enter the name of the project. Please no spaces ( ),or dots ( . ).
For Visibility level, select Private.
Select Initialize repository with a README and click on Create project
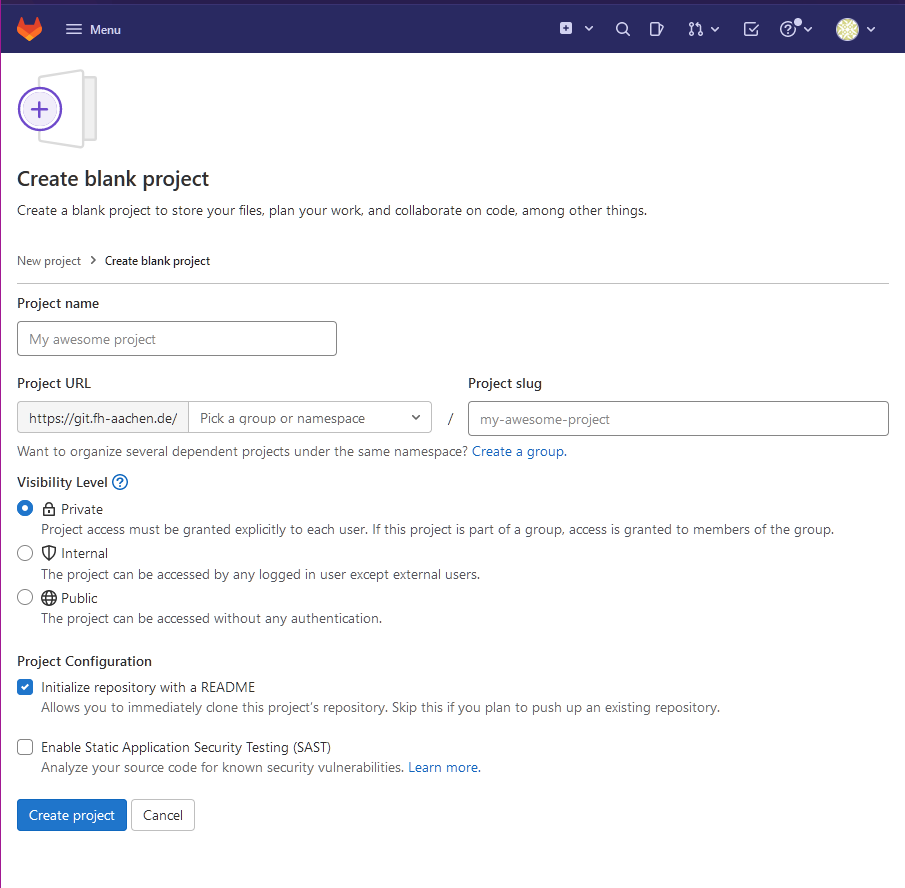
Fig. 11.16 Create new project on GitLab website.
11.2. Task 2
Todo
Managing project in VS Code.
Follow the steps below:
Have a ready setup of VS Code with connected GitLab account.
From the Get Started page on VS Code, click on Clone Git Repository. You can also clone a repository using Command Palette -> Git Clone.
Click Clone from GitLab -> Select the created repository from the list. Then select the link with https.
Select a folder to save the files on your PC. Prefer saving them in Documents folder. Then click Select Repository Location.
Once cloned, VS Code will ask you to whether to open the recent cloned repository in this window or a new window. Select Open.
11.3. Task 3
Todo
Managing branch and publishing branch.
Follow the steps below:
Create a new branch by click on bottom left option. ( Initially you will see Main written )
Select Create new branch. Enter the name of the new branch as “develop”.
Add a new folder in the project by clicking on New Folder from Explorer on the left side. Name the folder as Blink
Create a New File inside the folder Blink.ino. ! Extension is important
- Paste the following code in the file.
Click on Source Control from left panel. Enter a commit message “initial commit”.
Click on “Commit” button. Next, click on Publish Branch.
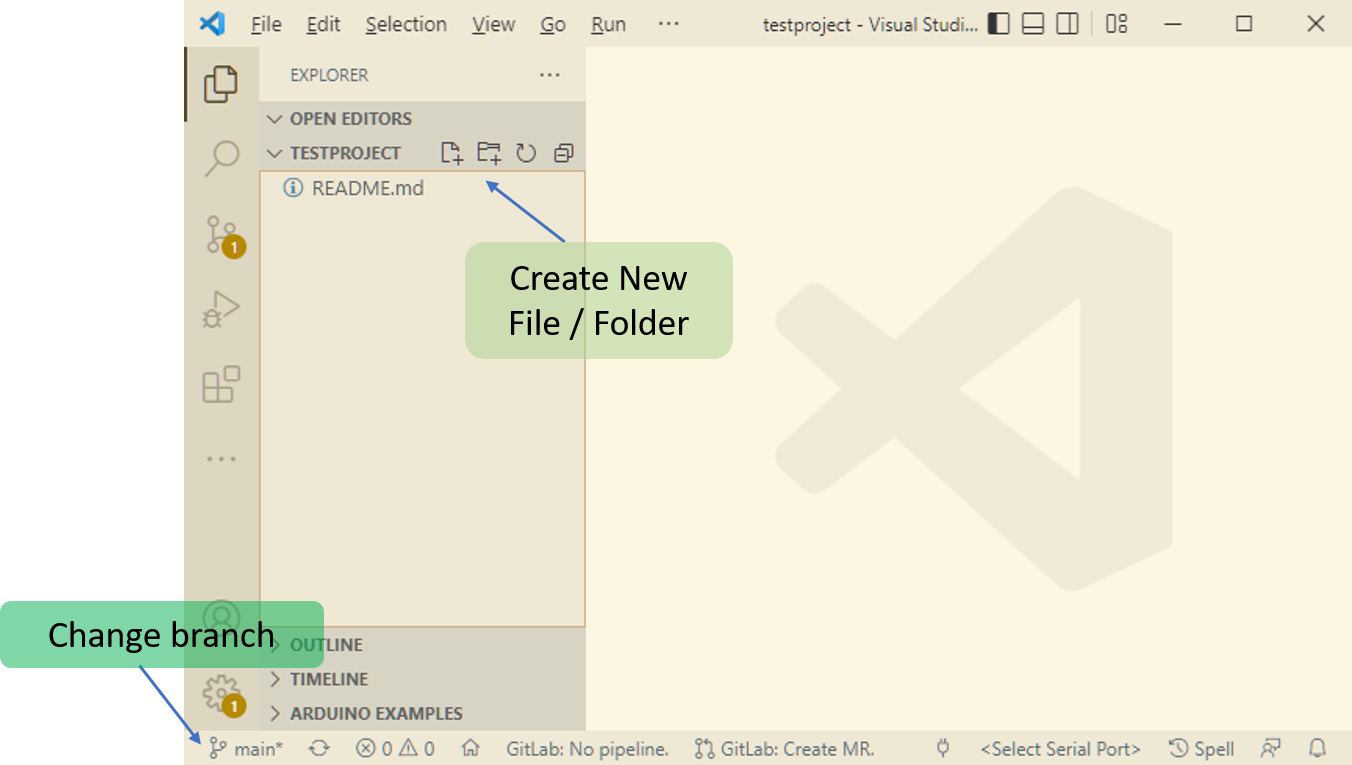
Fig. 11.17 VS Code Branches & File management
Hint
You can stage the required files for commit by using the plus(+) sign next to the files. When the commit button is pressed, only the staged files are committed.
The files which are not required can be added to git ignore by right clicking on the required file.

11.4. Task 4
Todo
Updating files online using GitLab website.
- Follow the steps below:
Open your project online on ( https://git.fh-aachen.de/ )
Switch the branch of the project to “develop”.
Locate the file “Blink.ino”.
Click on Open in web IDE.
- Add the following lines in the code between ” delay(1000); ” and ” } “
digitalWrite(LED_BUILTIN, LOW);    // turn the LED off by making the voltage LOW
delay(1000);                       // wait for a second
Once done, click on Create commit from the left side.
Enter a commit message “update LED blink”. De-select Start a new merge request.
Click on Commit button.
Note
When you update code online, this means that the code on your PC is old. To get the latest version of code, you must PULL the changes. This is done in next task.
For more information, Please read Workflow section of tutorial.
11.5. Task 5
Todo
Pulling and Pushing files from VS Code.
- Follow the steps below:
In VS Code, go to Source Control.
Click on Source Control menu (…) icon. In that, click on Pull. This will download the changes made from GitLab server.
Open the file “Blink.ino”.
Replace the delay time from 1000 to 2000 for both delay functions.
Save the file, and go to Source Control.
Enter a commit message, “Updated Blink duration”.
Click on Source Control menu (…) icon. In that, click on Push. This will upload the changes to GitLab server.
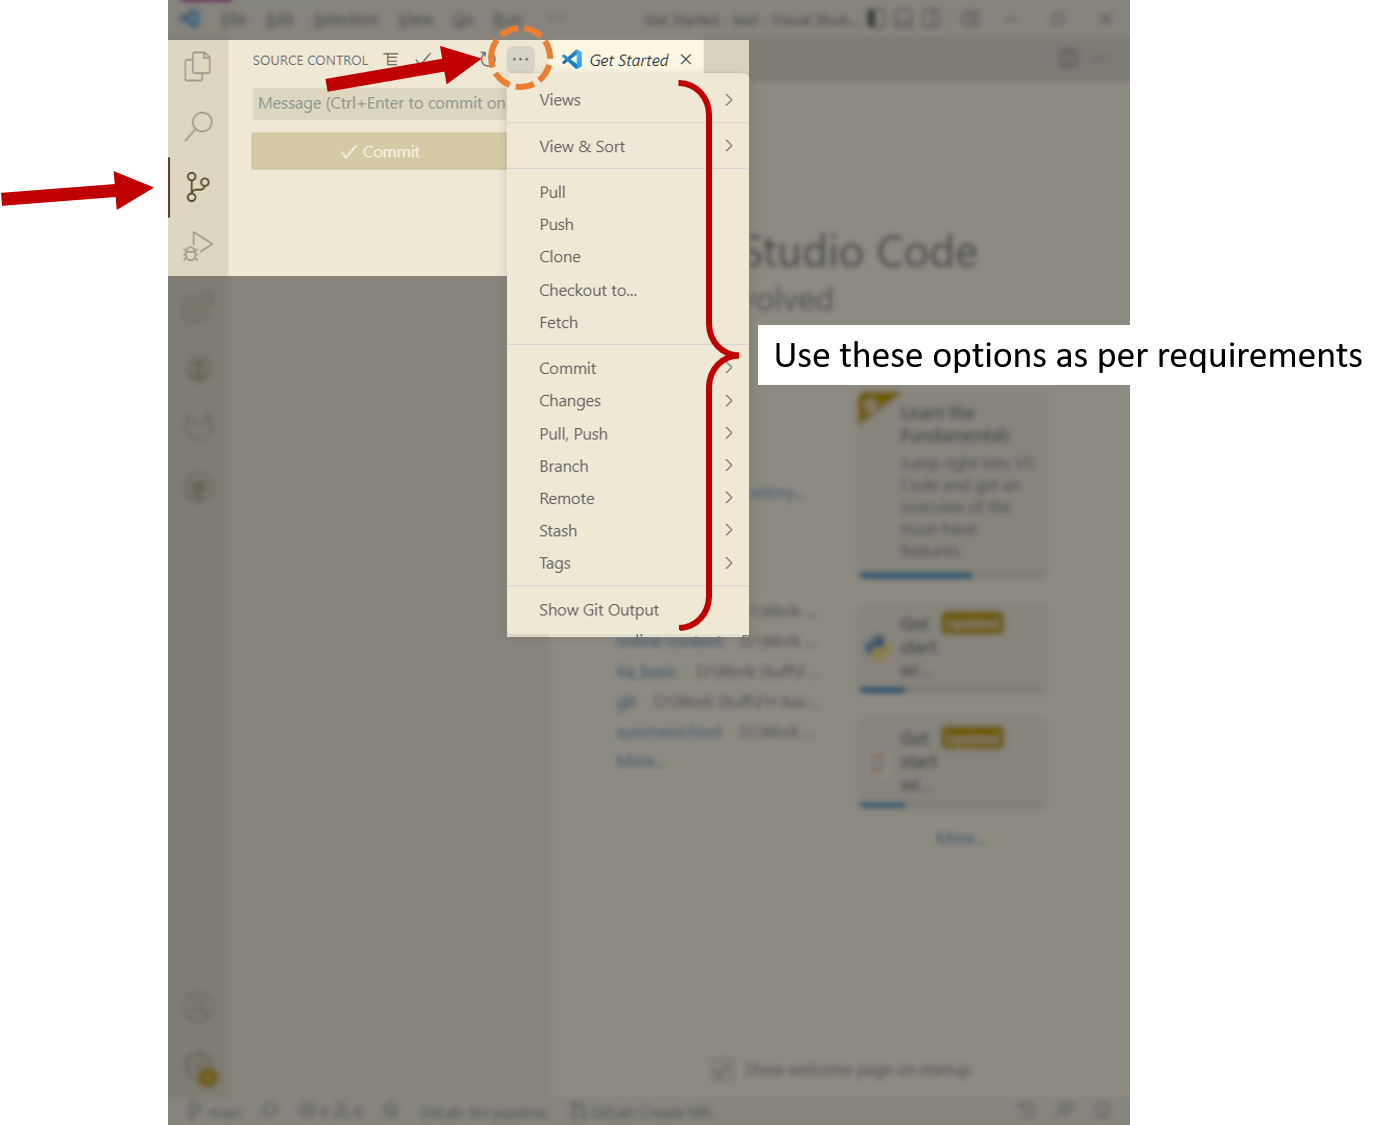
Fig. 11.18 VS Code Source control menu
11.6. Task 6
Todo
Merging “develop” to “main” branch.
- Follow the steps below:
Open your project online on ( https://git.fh-aachen.de/ )
From left side menu, click on Merge requests. On the new page, click on New merge request.
On the next page, select the source branch, “develop” and in target branch select “main” branch.
Next click on Compare branches and continue. Enter the title for the merge request.
In Description, provide brief information of the content of new feature / part completed with this branch.
Change rest of the options as per requirement.
Once all things are ready, click on Create merge request.
After this, another page would show up. This will show the details about the merge request. If everything is correct, it would show Ready to merge!.
Click on Merge to combine the code the main branch. After this, the changes will be moved to the main brnach.
Open the repository’s main page. Confirm whether the code is merged properly or not.
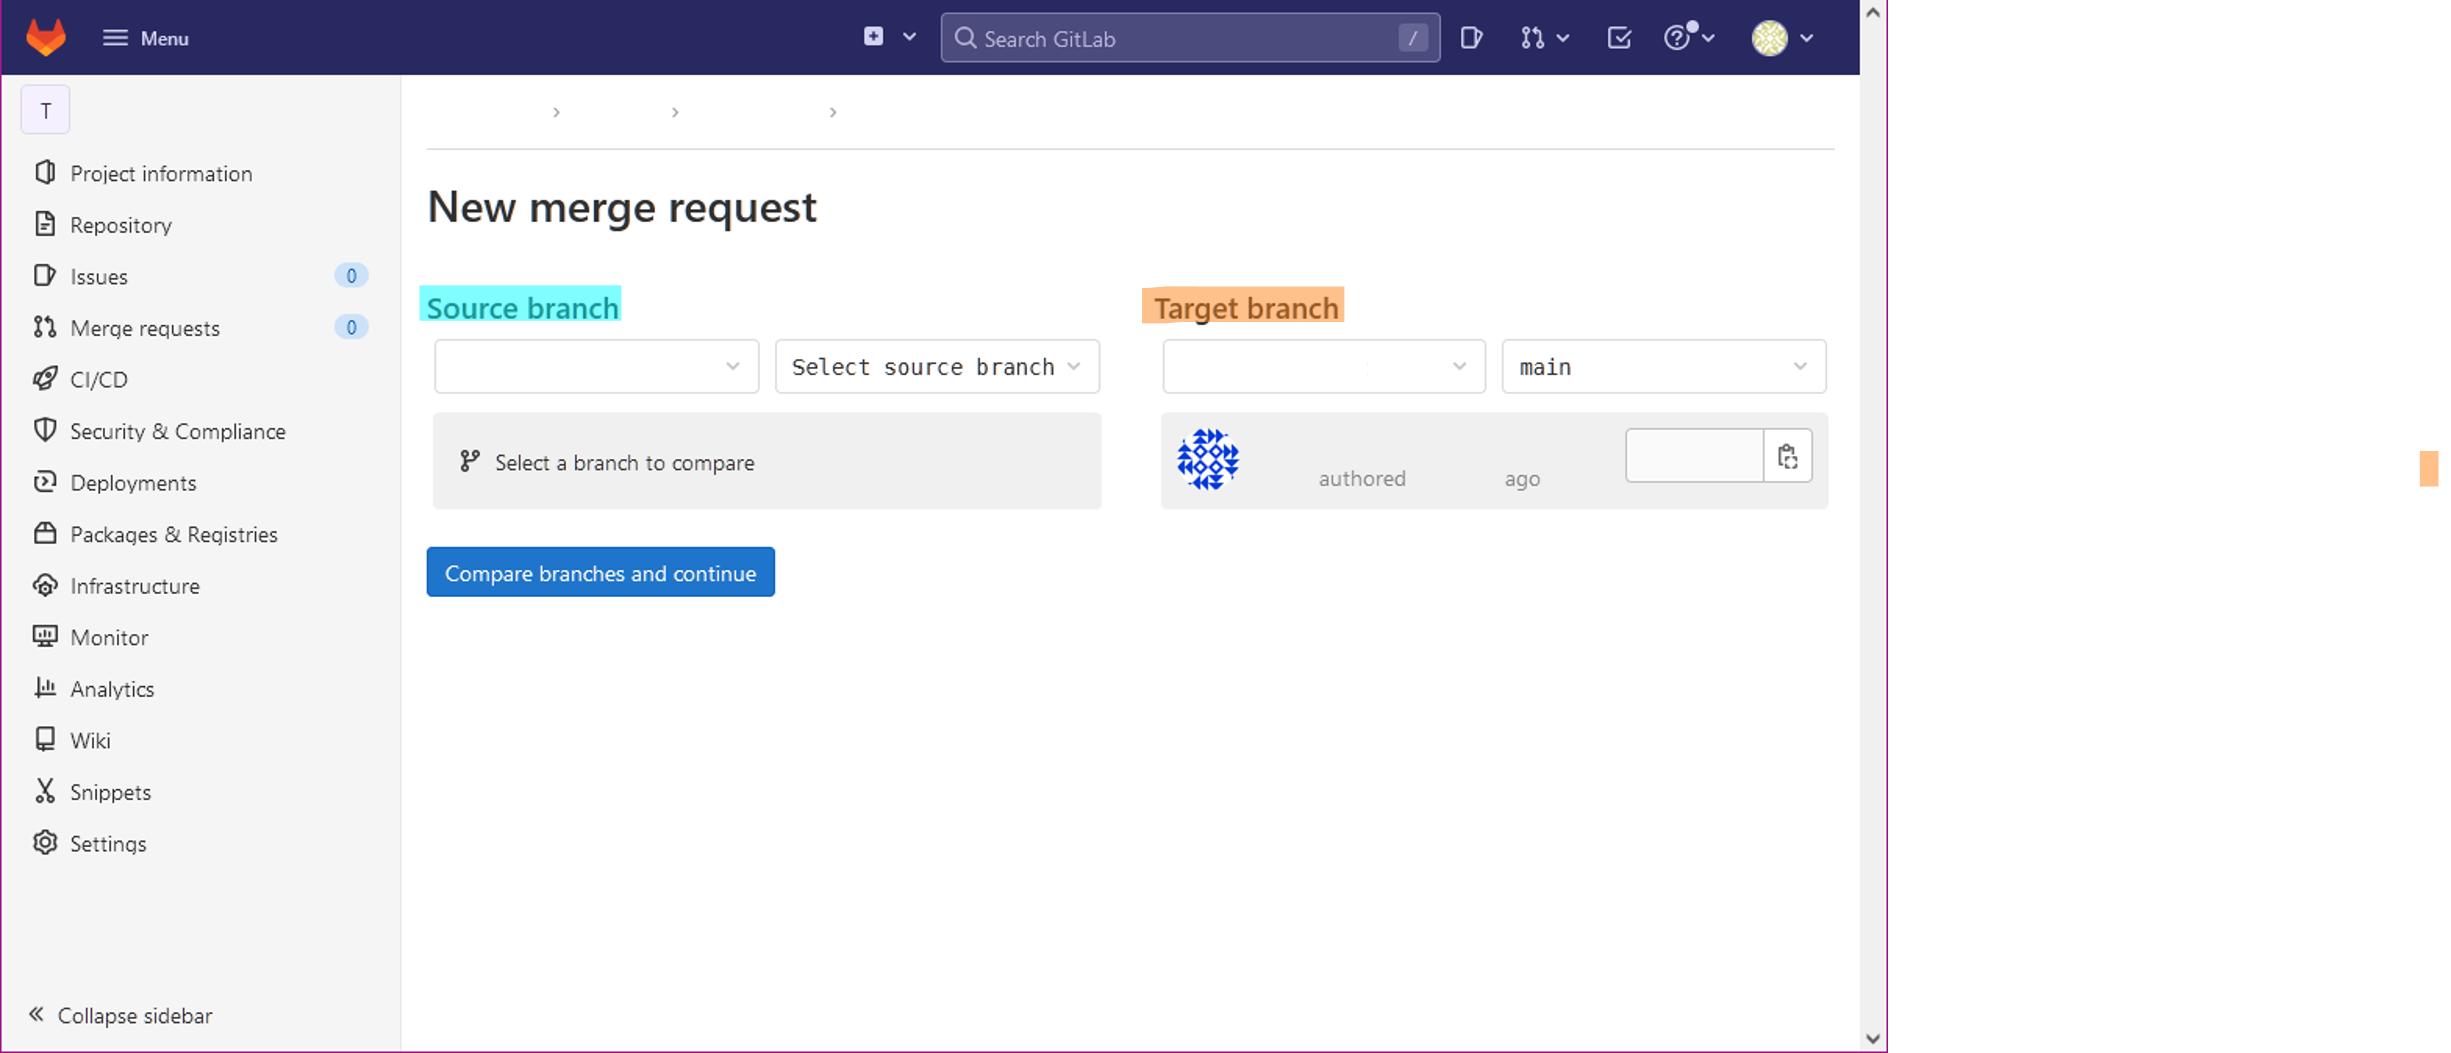
Fig. 11.19 GitLab merge branch page
11.7. Task 7
Todo
Create a annotated tag for this version of code.
- Follow the steps below:
In VS Code, go to Source Control.
Click on Source Control menu (…) icon. In that, click on Tags. Click on Create Tag.
Enter the required information such as Tag name and annotation message.
Click on View -> Command Palette.
Enter Git: Push Tags.
11.8. References
GitLab Manage projects https://docs.gitlab.com/ee/user/project/working_with_projects.html