12. Controlling Bittle (Advanced)
Danger
CONTENT UNDER REVIEW. Please ask the instructor before continuing with this section.
This section will described advanced methods to control your robot.
12.1. Using WiFi Adaptor
About the Sample Code: The sample code is a simple web server example, including 2 HTML pages. The two pages are stored in two header files in the form of string constants. The advantage is to avoid calling the client.print function constantly.
Set Up the WiFi Networks: Before we start our web server, we should configure the WiFi to connect to your local area network(LAN). We used to enter the WiFi SSID and password in the program, but it is very inconvenient while we need to change the network environment. We use the WiFi manager library to configure the WiFi information through web.
// WiFiManager
WiFiManager wifiManager;

// Start WiFi manager, default gateway IP is 192.168.4.1
wifiManager.autoConnect("Bittle-AP");
Web server: Create a new web server and configure port 80 (commonly used HTTP server port)
ESP8266WebServer server(80);
Configure 3 HTTP service handler: The HTTP response function is to handle the incoming HTTP requests.
void handleMainPage() {
//Serial.println("GET /");
server.send(200, "text/html", mainpage);
}
void handleActionPage() {
//Serial.println("GET /actionpage");
server.send(200, "text/html", actionpage);
}
The handleMainPage and handleActionPage response 200 (OK) and corresponding web HTML code for your web browser (client).
void handleAction(){
String argname = server.arg("name");

if(argname == "gyro"){              // gyro switch
    Serial.print("g");
}
The HandleAction function is slightly different. This is an HTTP request processing function with parameter passing. When the parameter is “gyro”, the serial port of the WiFi module sends out the command (“g”, switch IMU), so that our Bittle will execute the command. So how is this “gyro” parameter generated and passed? Because we sent such an HTTP request with a value to the server:
http://IP address or DomainName/action?name=gyro
The server parses the action parameter by the function and resolves that the name is “gyro”. We can directly enter this URL in the browser and execute it with the keyboard. The more common method is to add a link to the “Walk” button on the ActionPage web page. When the gyro button is pressed, the above URL will be sent to the host. The complete walk button configuration is as follows:
<button style="width: 25%" onclick="location.href='/action?name=gyro'">GyroOn/Off</button>
After parsing the “name” parameter, we send the actionpage again.
server.send(200, "text/html", actionpage);
We bond the handler method with the corresponding URLs.
server.on("/", handleMainPage);
server.on("/actionpage", handleActionPage);
server.on("/action", handleAction);
Start the Web Server:
server.begin();
Serial.println("HTTP server started");
Handle Client Requests:
void loop(void){
server.handleClient();
}
12.2. Using Python Scripts
The list testSchedule in example.py is used to test various serial port commands. Run the following script code to see the execution effect of each serial port command in the list:
for task in testSchedule:
wrapper(task)
You can also refer to the content of the stepUpSchedule list (in ..\serialMaster\demos\stepup.py), write a list of behaviors according to your actual needs, and realize your creativity.
Note: When running the scripts under the path of serialMasterdemos, you must first use the “cd demos” command to enter the path where the scripts are located (\serialMaster\demos), and then use the python3 command to run the script (e.g. “python3 stepup.py”)
Explanation of the serial port commands in the list testSchedule:
- [‘kbalance’, 2]
‘kbalance’ indicates the command to control Bittle to stand normally
2 indicates the postponed time after finishing the command, in seconds
- [‘d’, 2]
d indicates the command to put the robot down and shut down the servos
2 indicates the postponed time after finishing the command, in seconds
- [‘c’, 2]
c indicates the command to enter calibration mode
2 indicates the postponed time after finishing the command, in seconds. After these motion commands are completed, the next command will be executed after a 2-second delay.
- [‘c’, [0, -9], 2]
c indicates the command to enter calibration mode
0 indicates the index number of joint servo
-9 indicates the rotation angle, the unit is degree
2 indicates the postponed time after finishing the command, in seconds
Using this format, you can enter the calibration mode to calibrate the angle of a certain joint servo. Note: If you want the correction value in this command to take effect, you need to enter the “s” command after executing this command.
The meaning of this example: the joint servo with serial number 0 rotates -9 degrees. After these motion commands are completed, the next command will be executed after a 2-second delay.
- [‘m’, [0, -20], 1.5]
m indicates the command to control the rotation of the joint servo
0 indicates the index number of joint servo
-20 indicates the rotation angle (this angle refers to the origin, rather than additive) the unit is degree
1.5 indicates the postponed time after finishing the command, in seconds. It can be a float number.
[‘m’, [0, 45, 0, -45, 0, 45, 0, -45], 2]
Using this format, multiple joint servo rotation commands can be issued at one time, and these joint servo rotation commands are executed SEQUENTIALLY, not at the same time. The joint angles are treated as ASCII characters, so they can be entered directly by humans.
The meaning of this example is: the joint servo with index number 0 is first rotated to the 45 degree position, and then rotated to the -45 degree position, and so on. After these motion commands are completed, the next command will be executed after a 2-second delay.
[‘i’, [ 8, -15, 9, -20], 2]
Using this format, multiple joint servo rotation commands can be issued at one time, and these joint servo rotation commands are executed AT THE SAME TIME. The joint angles are treated as ASCII characters, so they can be entered directly by humans.
The meaning of this example is the joint servos with index numbers 8, 9 are rotated to the -15, -20 degree positions at the same time. After these motion commands are completed, the next command will be executed after a 2-second delay.
- [‘M’, [8, 50, 9, 50, 10, 50, 11, 50, 0, 0], 3]
M indicates the command to rotate multiple joint servos SEQUENTIALLY. The angles are encoded as BINARY numbers for efficiency.
8, 9, 10, 11, 0 indicate the index numbers of joint servos
50, 50, 50, 50, 0 indicate the rotation angle (this angle refers to the origin, rather than additive ), the unit is degree
3 indicates the postponed time after finishing the command, in seconds
- [‘I’, [20, 0, 0, 0, 0, 0, 0, 0, 45, 45, 45, 45, 36, 36, 36, 36], 5]
I indicates the command to control all joint servos to rotate AT THE SAME TIME (currently the command supports 16 degrees of freedom, that is, 16 servos) . The angles are encoded as BINARY numbers for efficiency.
20,0,0,0,0,0,0,0,45,45,45,45,36,36,36,36 indicate the rotation angle of each joint servo corresponding to 0-15 (this angle refers to the origin, rather than additive), the unit is degree
5 indicates the postponed time after finishing the command, in seconds
- [‘b’, [10,2], 2]
b indicates the command to control the buzzer to beep
10 indicates the music tone
2 indicates the lengths of duration, corresponding to 1/duration second
2 indicates the postponed time after completing the tone, in seconds
- [‘b’,[0, 1, 14, 8, 14, 8, 21, 8, 21, 8, 23, 8, 23, 8, 21, 4, 19, 8, 19, 8, 18, 8, 18, 8, 16, 8, 16, 8, 14, 4],3]
b indicates the command to control the buzzer to beep
0, 14, 14, 21… indicate the music tones
1, 8, 8, 8 indicates the lengths of duration, corresponding to 1/duration second
The last 3 indicates the postponed time after the music melody is played, in seconds
Using this format, multiple tone pronunciation commands can be issued at once, and a simple melody can be played.
The meaning of this example is: play a simple melody, and delay 3 seconds after the music melody is played.
ck = [
    -3, 0, 5, 1,
    0, 1, 2,
    45, 0, 0, 0, 0, 0, 0, 0, 45, 35, 38, 50, -30, -10, 0, -20, 6, 1, 0, 0,
    -45, 0, 0, 0, 0, 0, 0, 0, 35, 45, 50, 38, -10, -30, -20, 0, 6, 1, 0, 0,
    0, 0, 0, 0, 0, 0, 0, 0, 30, 30, 30, 30, 30, 30, 30, 30, 5, 0, 0, 0,
    ]
- [‘K’, ck, 1]
‘K’ indicates the skill data to send to Bittle in realtime
The skill array is sent to the robot on the go and executed locally on the robot
You may insert the skills in the skill library or InstinctX.h in this format
12.3. Creating New Skills
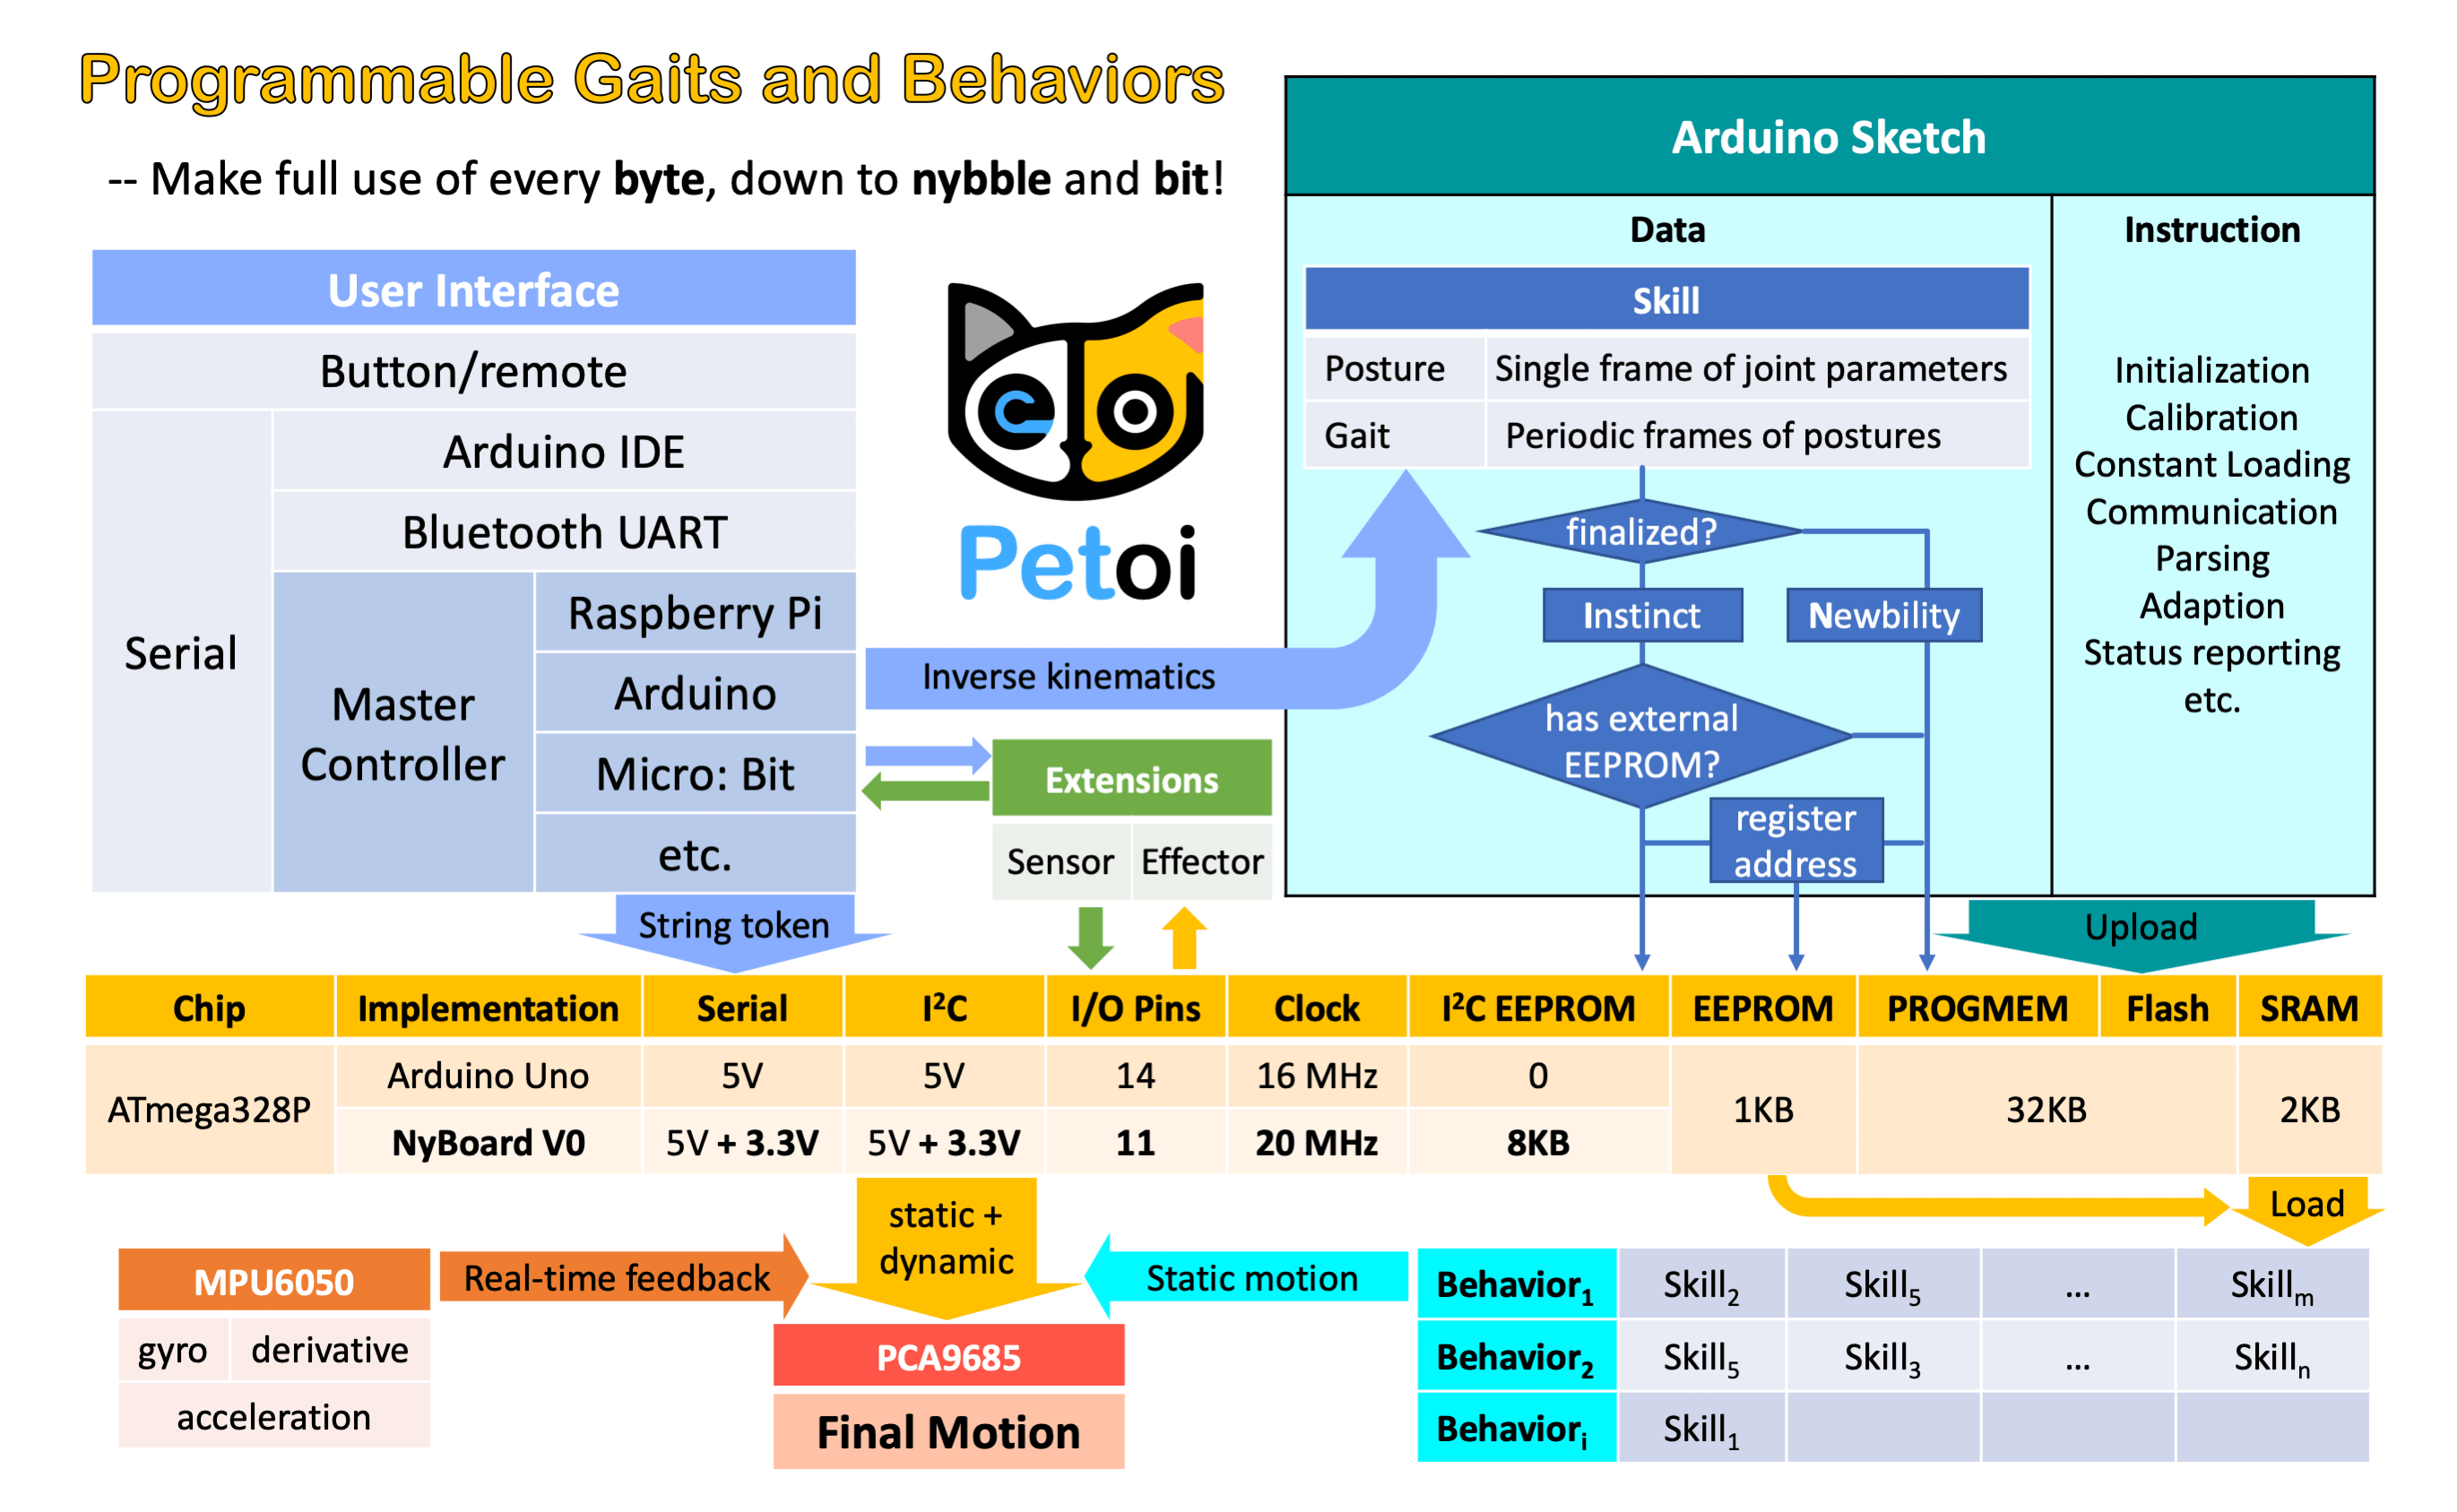
Fig. 12.1 InstinctBittle.h file Summary
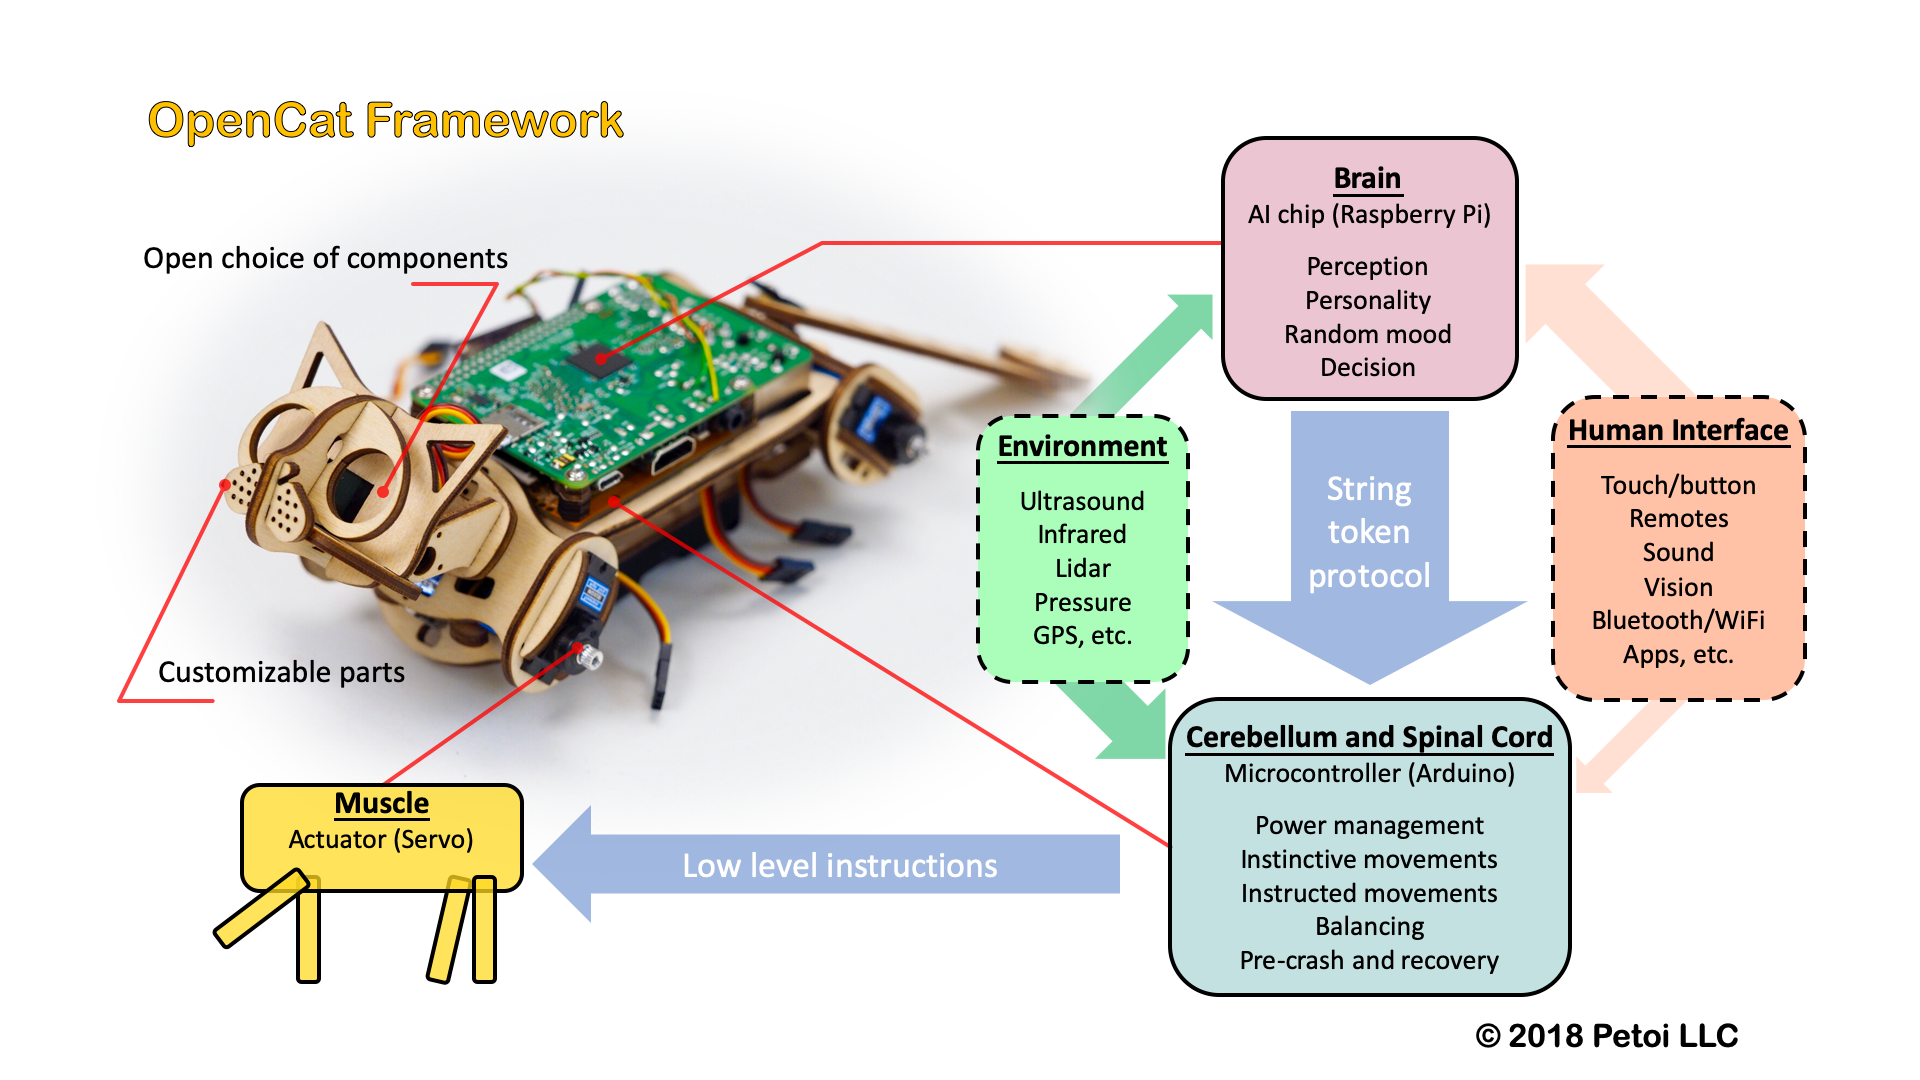
Fig. 12.2 OpenCat Framework Summary