7. Controlling Bittle
- To control Bittle, there are five methods,
Use IR Remote (First choice)
Use Mobile App
Use Arduino IDE / PlatformIO
Use Desktop App
Use Python Scripts
Note
To ZOOM the image, Right Click the image and click Open in New Tab.
7.1. Using IR Remote
The IR command map is defined inside OpenCat/src/infrared.h. In the file, the commands are described as #define KXX command . For example, K00 for the 1st row and 1st column and K32 for the 4th row and 3rd column.

Fig. 7.1 IR controls
7.2. Using Mobile App
The mobile app has the following dashboard.
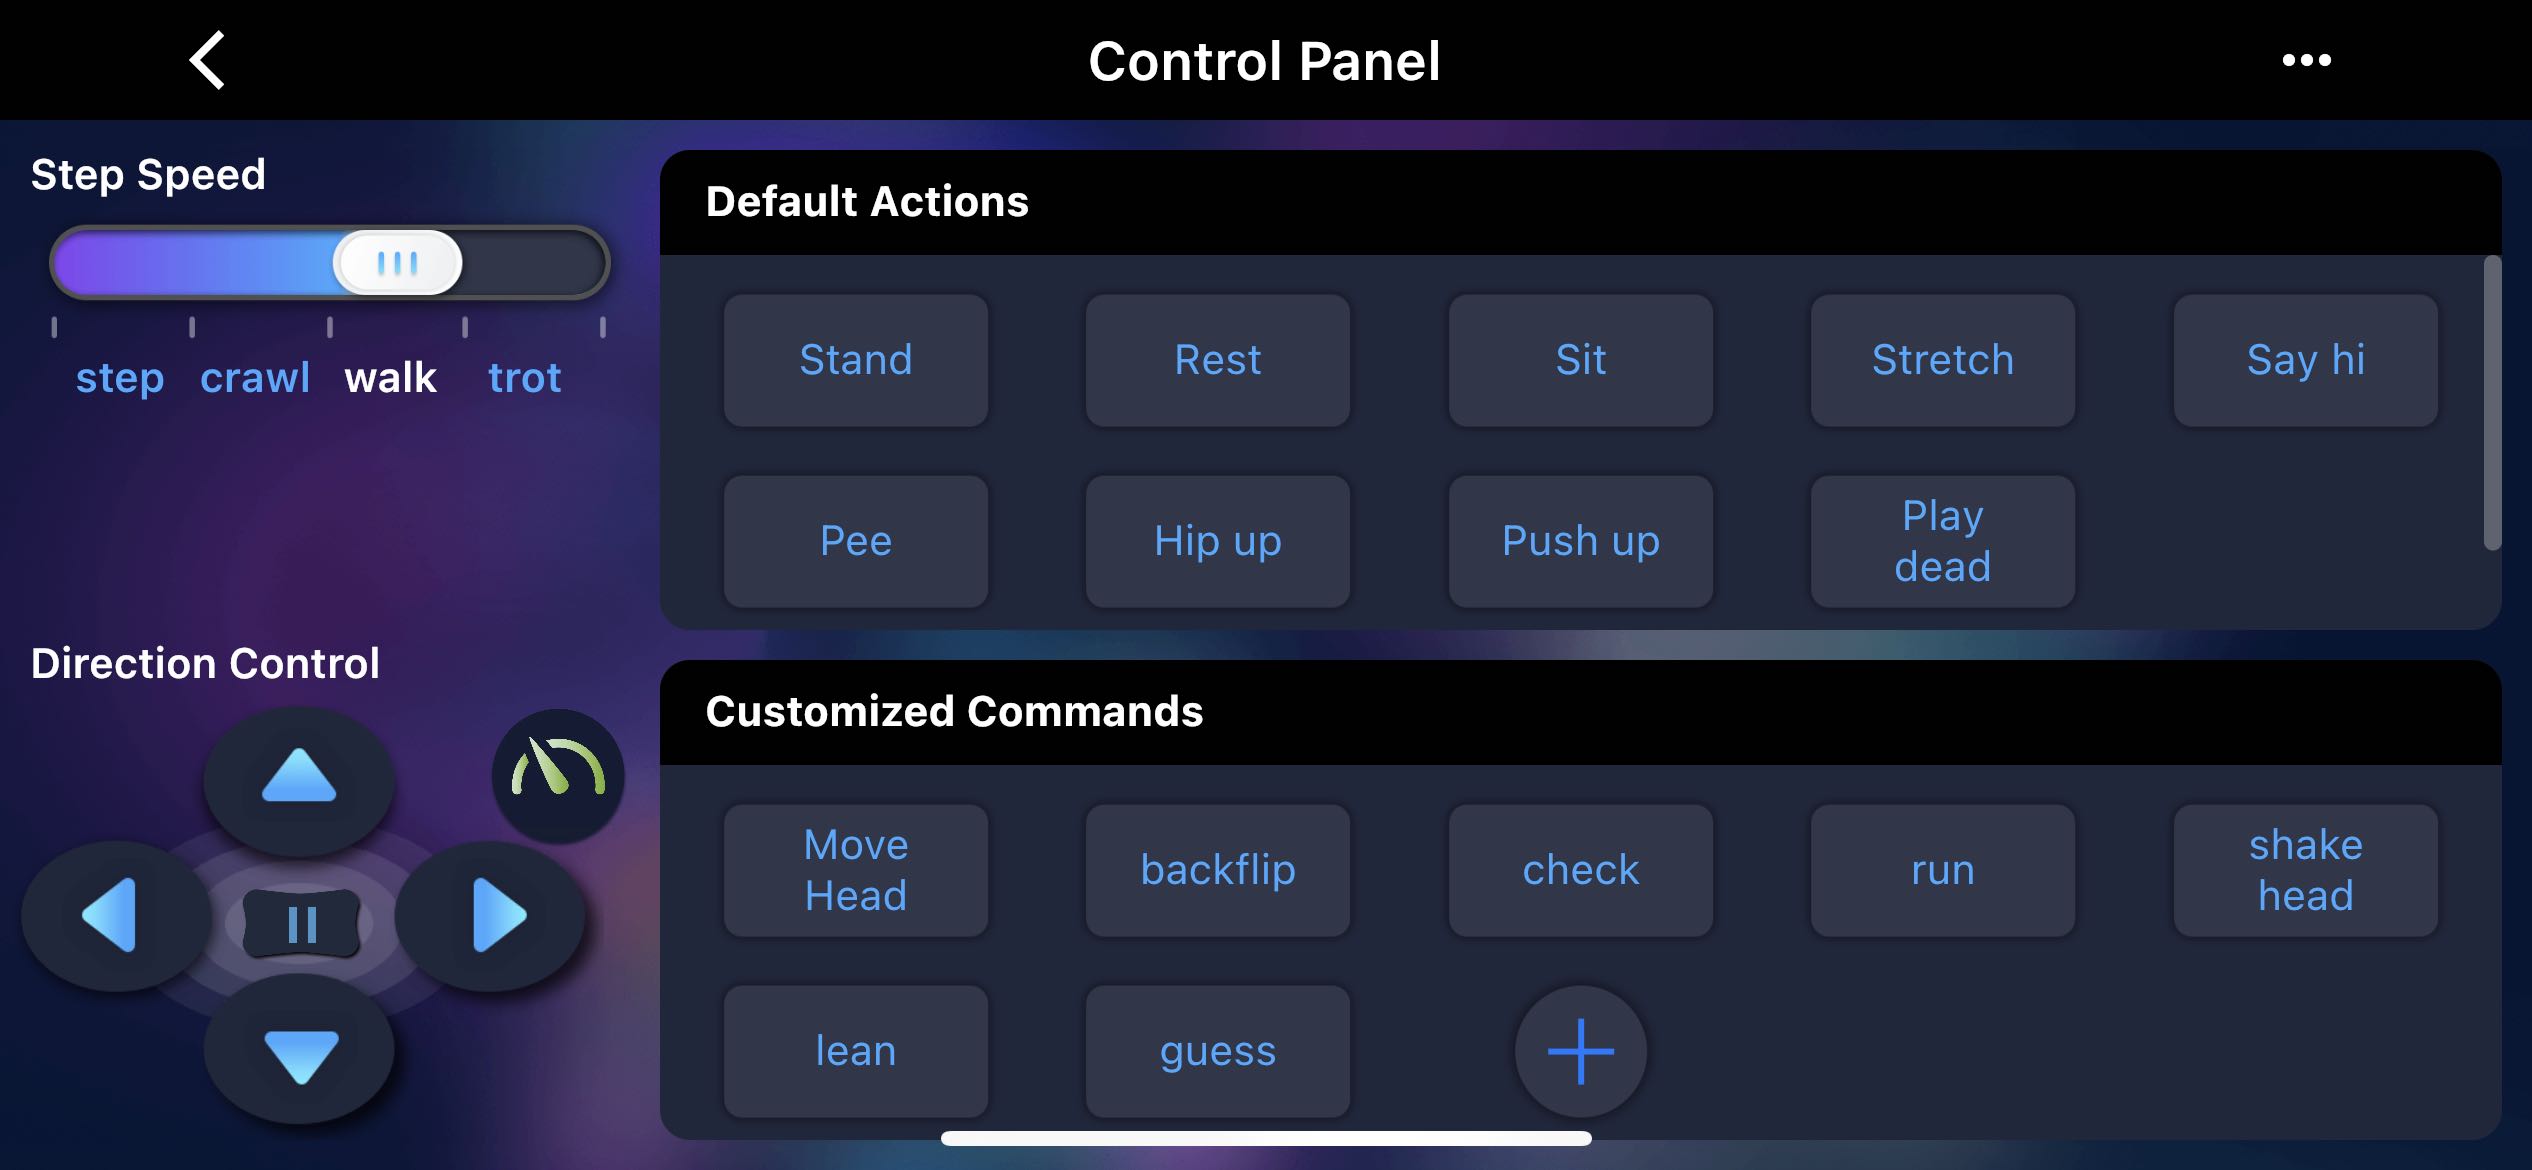
Fig. 7.2 App dashboard
The app allows the following functions and controls:
Gaits:
The left panel sets both the robot’s gaits and directions and send combined command, such as “walk left” and “trot forward”. The robot will only move if an initial gait and direction are selected. The “step” has no direction, and “backward” has left and right directions.
The Pause button “||” will pause the robot’s motion and turn off the servos, so that you can rotate the joints to any angle.
The Turbo button (green dial icon) turns on/off the gyro which is used to detect the robot’s body orientation. Turning it on will make the robot keep adjusting to body angles, and will know when it’s upside down. Turning it off will reduce calculation and make it walk faster and more stable.
Default Actions:
The built-in postures and behaviors can be triggered by pressing the buttons.
Warning
Don’t press the button too frequently and repeatedly. Allow some time for the robot to finish its current tasks.
Customized Commands
You can also define customized commands by pressing the “+” button. Long-press a custom command button to edit it. There’s a lite serial console to test the command and even configure the robot.
These commands are created using the Serial Commands defined in “Using IDE” section. For example, i 8 -30 12 40 0 35 means that motors at 8, 12, 0 will move to angles -30, 40 and 35 respectively.
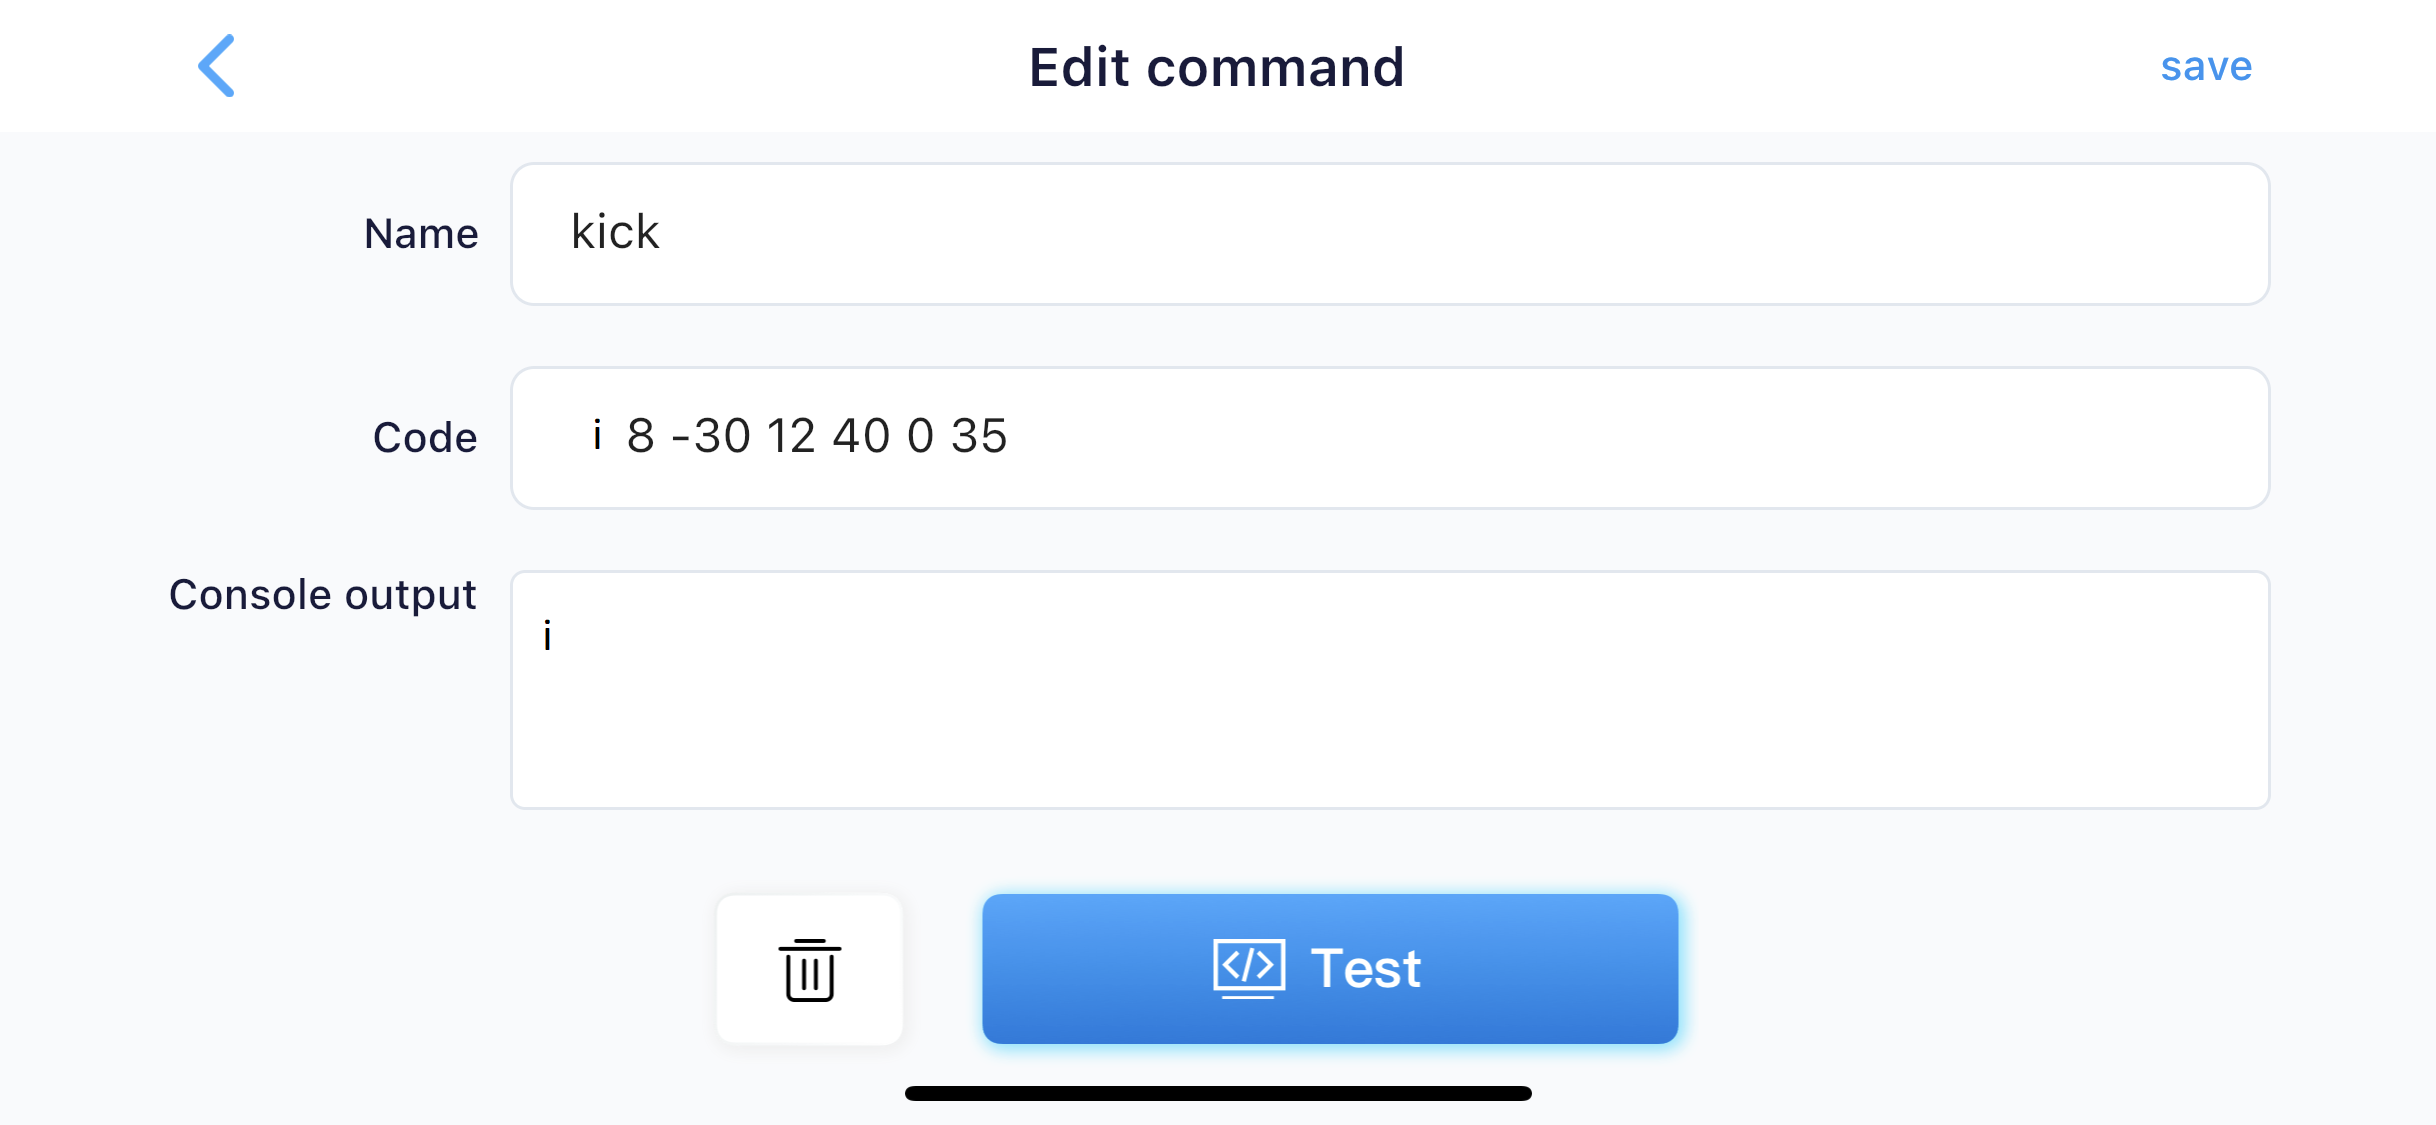
Fig. 7.3 Custom action command
7.3. Using IDE
This section mainly focuses on controlling the robot using serial communication. There are pre-defined protocol which uses ASCII encoding. The commands are case sensitive.
- Few example commands are:
ksit
m0 30
m5 -15
kbalance
The complete command list is provided in the cheat sheet section.
Note
Some commands, like the c and m commands can be combined.
For example:
Successive “m8 40”, “m8 -35”, “m 0 50” can be written as “m8 40 8 -35 0 50”. You can combine up to four commands of the same type.
To be exact, the length of the string should be smaller than 30 characters.
You can change the limit in the code but there might be a systematic constraint for the serial buffer.
7.4. Using Desktop App
The desktop app has the following dashboard.
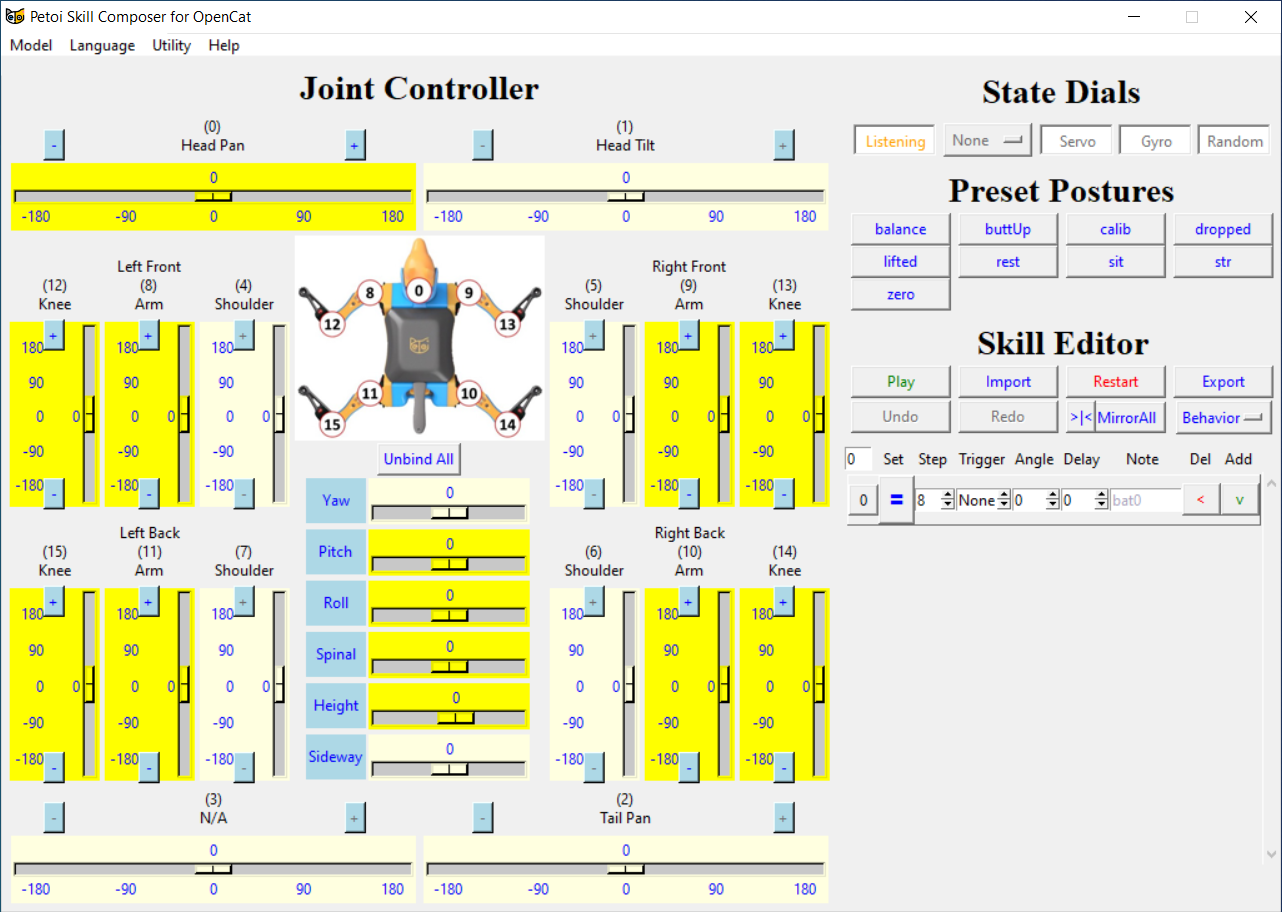
Fig. 7.4 App dashboard
The app allows the following functions and controls:
Joint Controller:
The center of this area is a schematic diagram marked with the index number of the joint servo. Control slider is used for changing the degree of servo. The number above the slider indicates the angle value of the servo rotation in real-time. The number below the track indicates the angle range(-180 ~ 180)of the servo rotation, though the boundaries may not be reachable by the real robot. Press and drag the slider with the mouse to adjust the rotation angle of the servo, and the robot’s joints will move in real time.
- There are 2 linkage buttons corresponding to each servo (forward linkage symbol “+”, reverse linkage symbol “-“). After clicking the linkage buttons of multiple servos, press and drag the control slider of one of the servos with the mouse:
The rotation direction of the joint servo corresponding to the forward linkage button + is the same as the rotation direction of the servo controlled by the mouse.
The rotation direction of the joint servo corresponding to the reverse linkage symbol - is opposite to the rotation direction of the servo controlled by the mouse.
“Unbind All” button: It is used to cancel the linkage of all joint servos at once.
- Control the robot body pose sliders as follows:
Global Orientation and Translation
Effect
Pitch
Adjust the pitch angle
Roll
Adjust the roll angle
Spinal
Move in the spinal direction
Height
Raise or lower the robot’s body
State Dials:
The state dials are used to connect the device either using USB connecting or via Bluetooth. You can select the appropriate COM port of your robot from the drop down list.
By default the software will be in Listening mode and will keep looking for devices to be connected. Once connected, the status changes to Connected. You can disconnect and disable auto-lookup by clicking on the same status. (Its a button as well.)
Note
Please select the required PORT from the list. Do not leave it to ALL option.
When a device is connected, three Button are available for user -> Servo, Gyro and Random. The button description is mentioned below:
Dial |
On State |
Off State |
Servo |
All servos enter the locked state, and |
All servos are unloaded, and the joints |
do not manually adjust the robot |
can be rotated at will, which is convenient |
|
posture at this time |
for users to manually adjust the robot’s posture |
|
Gyro |
The robot continuously calculates its |
The balancing calculation is skipped to make the |
body orientation and try to keep balance. |
loops faster. The gaits will be accelerated. |
|
It will self-right after falling over. |
The robot won’t self-right when you flip it. |
|
Random |
The robot will randomly move every few |
The robot won’t move on its own. |
seconds if you have uploaded the firmware |
||
with RANDOM mode. |
Preset Postures:
The Preset Postures are shortcuts for some preset poses of each robot. After clicking these posture buttons, both the robot and the sliders will update to the new joint angles.
Skill Editor:
Danger
CONTENT UNDER REVIEW.
7.5. Using Python Scripts
This section allows you to send commands using python interface. The commands can be the pre-defined skills like kbalance or your custom movement commands which are developed using the base serial commands like m 0 -30 0 30
To begin, open Terminal / Command Prompt CMD and navigate to OpenCat/serialMaster. (Please refer Download Base Firmware for download information.)
- To run commands, there two methods:
Using ardSerial.py
Using custom scheduler
Using ardSerial.py:
- Use the following syntax to send commands:
With skill as parameter:
..\serialMaster>python3 ardSerial.py kbalance
Without parameter:
..\serialMaster>python3 ardSerial.py
To exit the script use quit or q.
Using custom scheduler:
Using custom script, you can control individual motor to perform a specific task as defined in the script and at specific timing.
- An example file is provided which can be executed using the following command:
..\serialMaster>python3 example.py
Additional information about this is provided in a separate section to keep this short. You can read about it here Controlling Bittle (Advanced).