13. Controlling Bittle (Codecraft)
13.1. Introduction
Codecraft is a graphical programming software. It is based on the Scratch 3.0 language and enables programming by simply “drag & drop” of predefined blocks. It is available as a web and downloadable application.
The web version is available at ( https://ide.tinkergen.com/ ). Here you can make codes but to upload to your hardware, you would need a client application for your PC. You can find more information here: ( https://www.yuque.com/tinkergen-help-en/codecraft/assistant?language=en-us )
To download complete software, from the following link: ( https://ide.tinkergen.com/download/en/ ). This includes IDE and uploader for your hardware.
When you open the application, you have to select the hardware you will use for programming. In our case, it’s Bittle. After that you will be redirected to the programming UI.
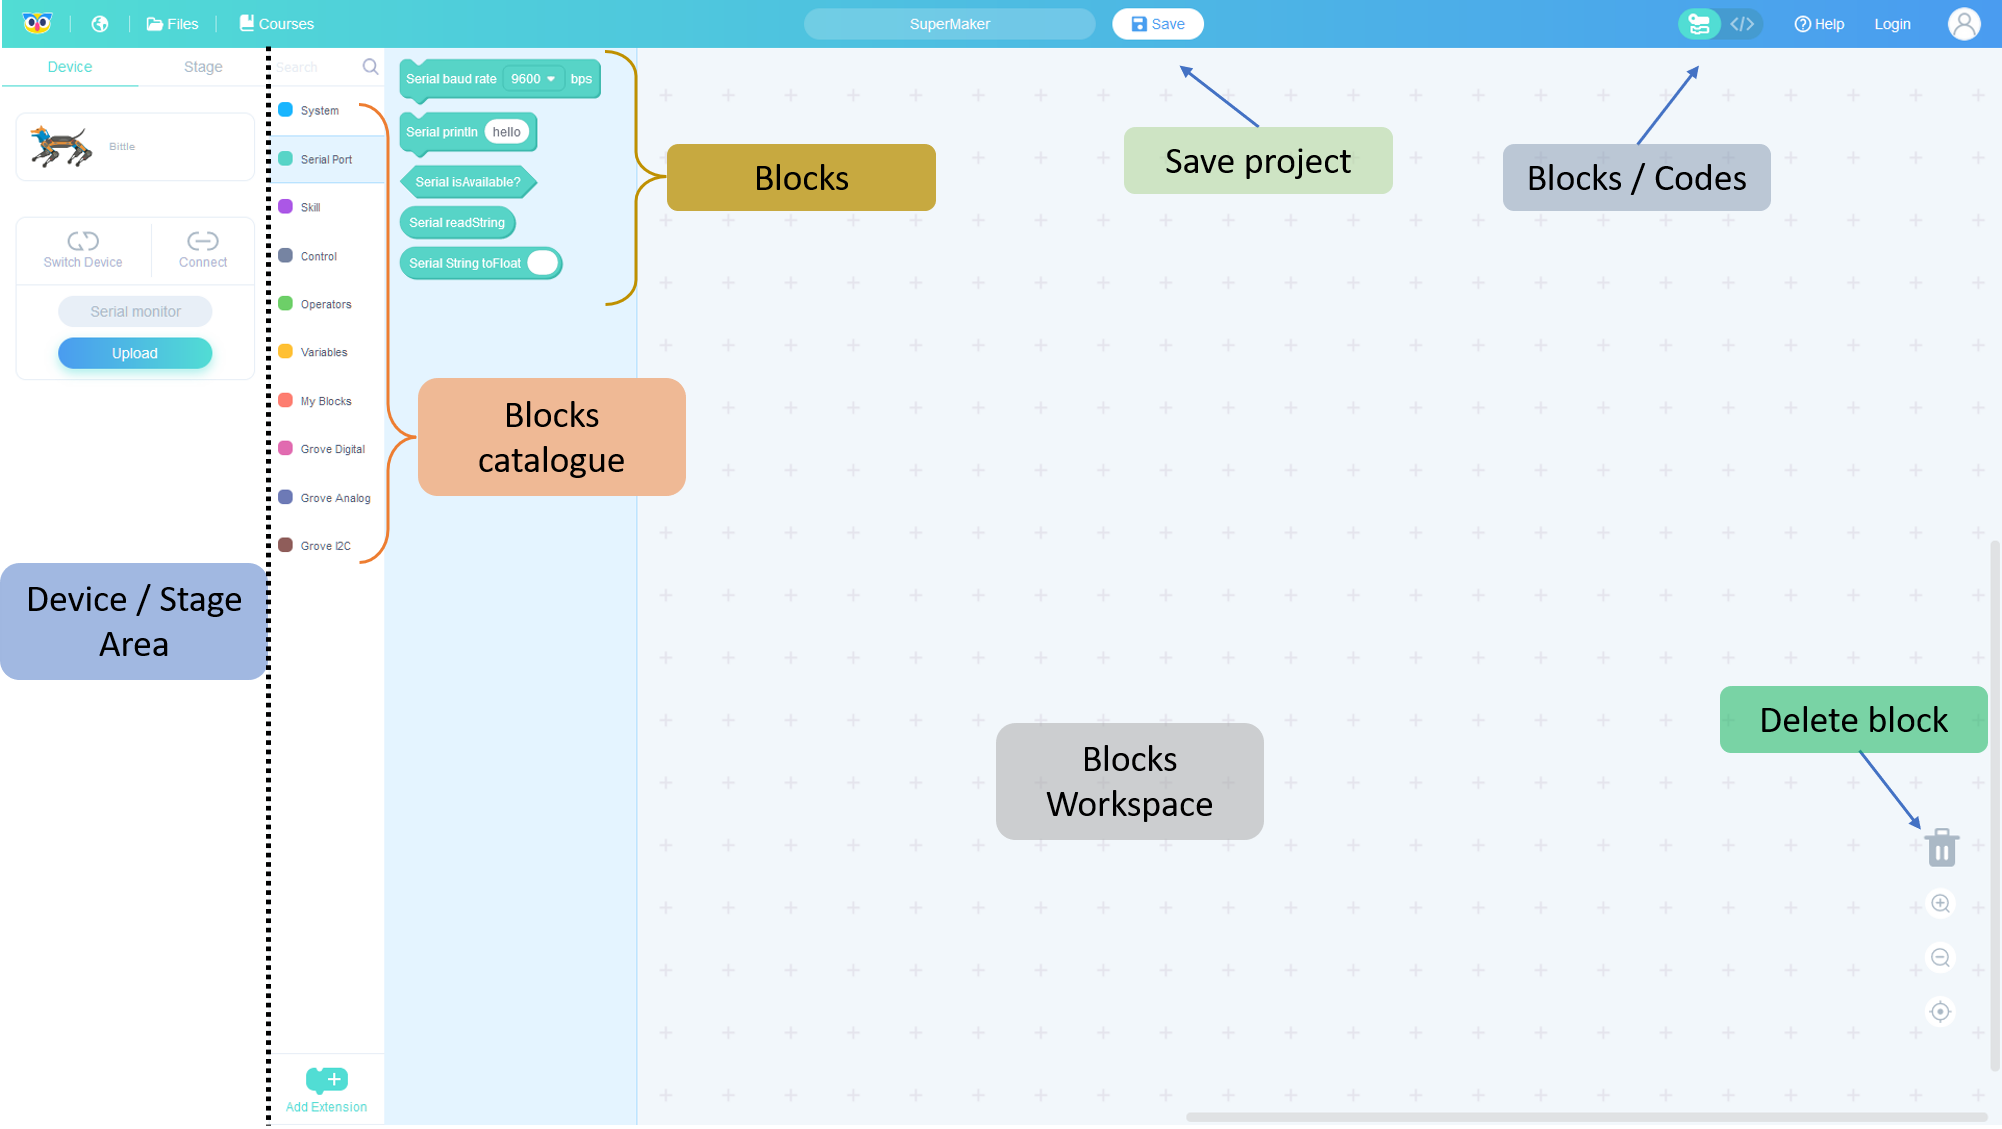
Fig. 13.1 Codecraft UI Guide
For detailed information about UI elements, visit ( https://www.yuque.com/tinkergen-help-en/codecraft/tour_overview )
Warning
Note that Codecraft doesn’t support OpenCat 2.0. You’d need to use OpenCat 1.0 instead. You can find the details here: https://github.com/PetoiCamp/OpenCat/tree/1.0
13.1.1. Upload Code
To upload the code from Codecraft, you would need to connect the USB-Adaptor (First choice). You can also use a Bluetooth Adaptor.
From the Device / Stage section, use the Connect button to connect to your device. Then use the Upload button to upload code.
13.1.2. Monitor Serial Values
From the Device / Stage section, use the Connect button to connect to your device. Then use the Serial monitor button to upload code.
Warning
If the walking movements in the following tutorials are not working as intended. Try re-calibrating the motors. Visit the Calibration section for more information.
13.2. Programming with Blocks
13.2.1. Block Shapes
- There are five different block shapes in Codecraft:
Hat Block
Stack Block
Boolean Block
Reporter Block
C Block
1. Hat Block Hat blocks are the blocks that start every script. The rest of the blocks should be attached to top hat block. Please note that different hat blocks start each program code in different ways.
2. Stack Block Stack blocks are the blocks that perform the main commands. They are shaped with a notch at the top and a bump on the bottom — this is so blocks can be placed above and below them.
3. Boolean Block A Boolean block can be placed in corresponding hexagon slots and could not be used separately. Boolean is a condition (true or false).
4. Reporter Block Reporter blocks can be placed anywhere that needs data and could not be used separately. As long as there is a slot corresponding to a reporter block, it can be placed as needed. Reporter blocks can hold numbers and strings.
5. C Block C blocks are blocks that take the shape of “C’s”. Also known as “Wrap blocks”, these blocks loop the blocks within the Cs or check if a condition is true.

Fig. 13.2 Codecraft Block Guide
13.2.2. Basics
- To begin programming, you would need a Setup & Loop block. You can grab one from System block catalogue. This resembles the two sections of an Arduino code.
The Setup block must include code line which are required to be executed only once such as initializing new hardware or defining pin behaviors (whether input pin or output pin).
The Loop block includes code lines which need to be called repeatedly. The sequence of execution if from top to bottom. This can be used for turning LED on and off after every 1 second.
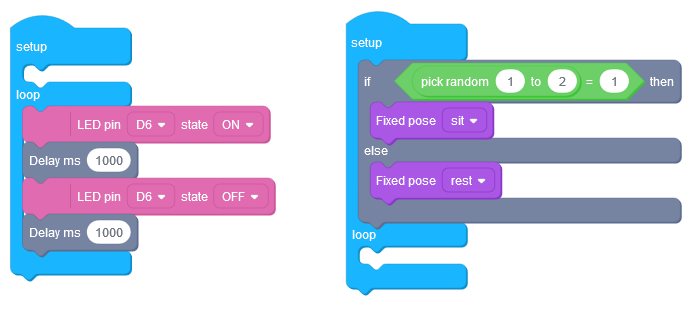
Fig. 13.3 Example: Blink & Initial posture of Bittle
- The simplest code for movement includes at least three blocks:
setup-loop block
set movement block
execute movement block

Fig. 13.4 Example: Basic Movements
The movement blocks have many lines of codes. Each line represents a set of joint angles which is sent from the Bittle’s memory to the motors. The block has the required angle list to complete 1 cycle of walk.
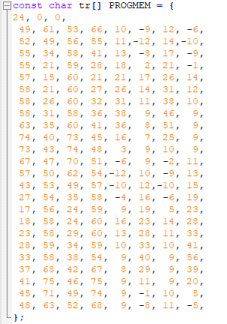
Fig. 13.5 Servo angles for forward movement
- Thus to have a continuous walking movement, you need to repeat the block for some time. In terms of Bittle, this execution differs from other wheel based surface robots. In wheel based surface robots, you only need to set the motors on and off to control the movement. But in case of Bittle or other Legged robots, you need to repeat the movement action for certain amount. An example of moving forward and backward is shown below. In this example, the movements are repeated for 1000 times before changing the action.

Fig. 13.6 Example: Multiple Actions
13.2.2.1. Variables
To define custom variables, you can add new variables using Variables section in block catalogue. The current version only supports variables of type float.
13.2.2.2. My Blocks
To create custom function block, use the My Blocks section in block catalogue. You can provide 2 type of inputs for the function block; a float value and a boolean value.

Fig. 13.7 Example: Variables & Blocks
13.2.3. IR-Remote Control
IR Remote can be used in combination to the movement commands to control the robot. The key mapping in reference to Codecraft is provided below:
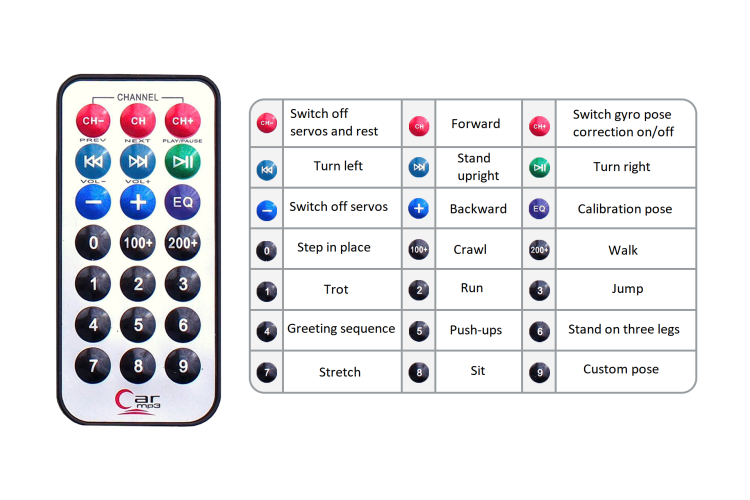
Fig. 13.8 Example: IR Remote Codecraft
To include IR library in your code, you will need to add a Infrared Receiver started block in your code. This adds the required library and enables the commands related to that library. An example to stop Bittle using IR Remote is shown below. The robot will walk in forward direction until Play/Pause button is pressed on the remote.
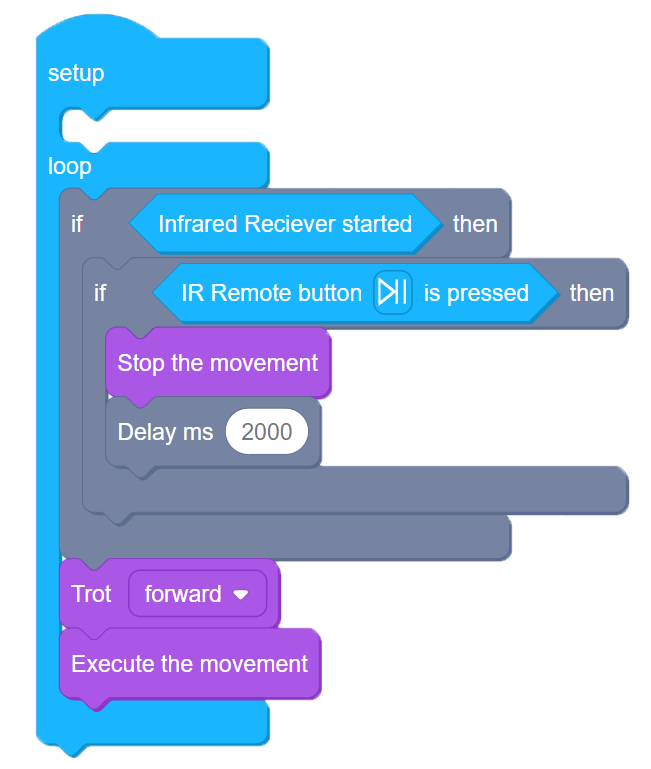
Fig. 13.9 Example: IR Remote Demo
You can even use serial monitor to print the raw IR codes of buttons pressed on remote.
13.2.4. Advanced Control
13.2.4.1. Custom Skills
You can create custom skills for your Bittle. To do so, from the Codecraft UI click on Add Extension. Select Create Skill from the Extension Library pop-up. A new catalogue will be added named as Create Skill.
Inside Create Skill, you can set the Joint angles for all the motors on your robot and can create a sequence of different positions to form a complete action just like the walking forward example shown earlier.
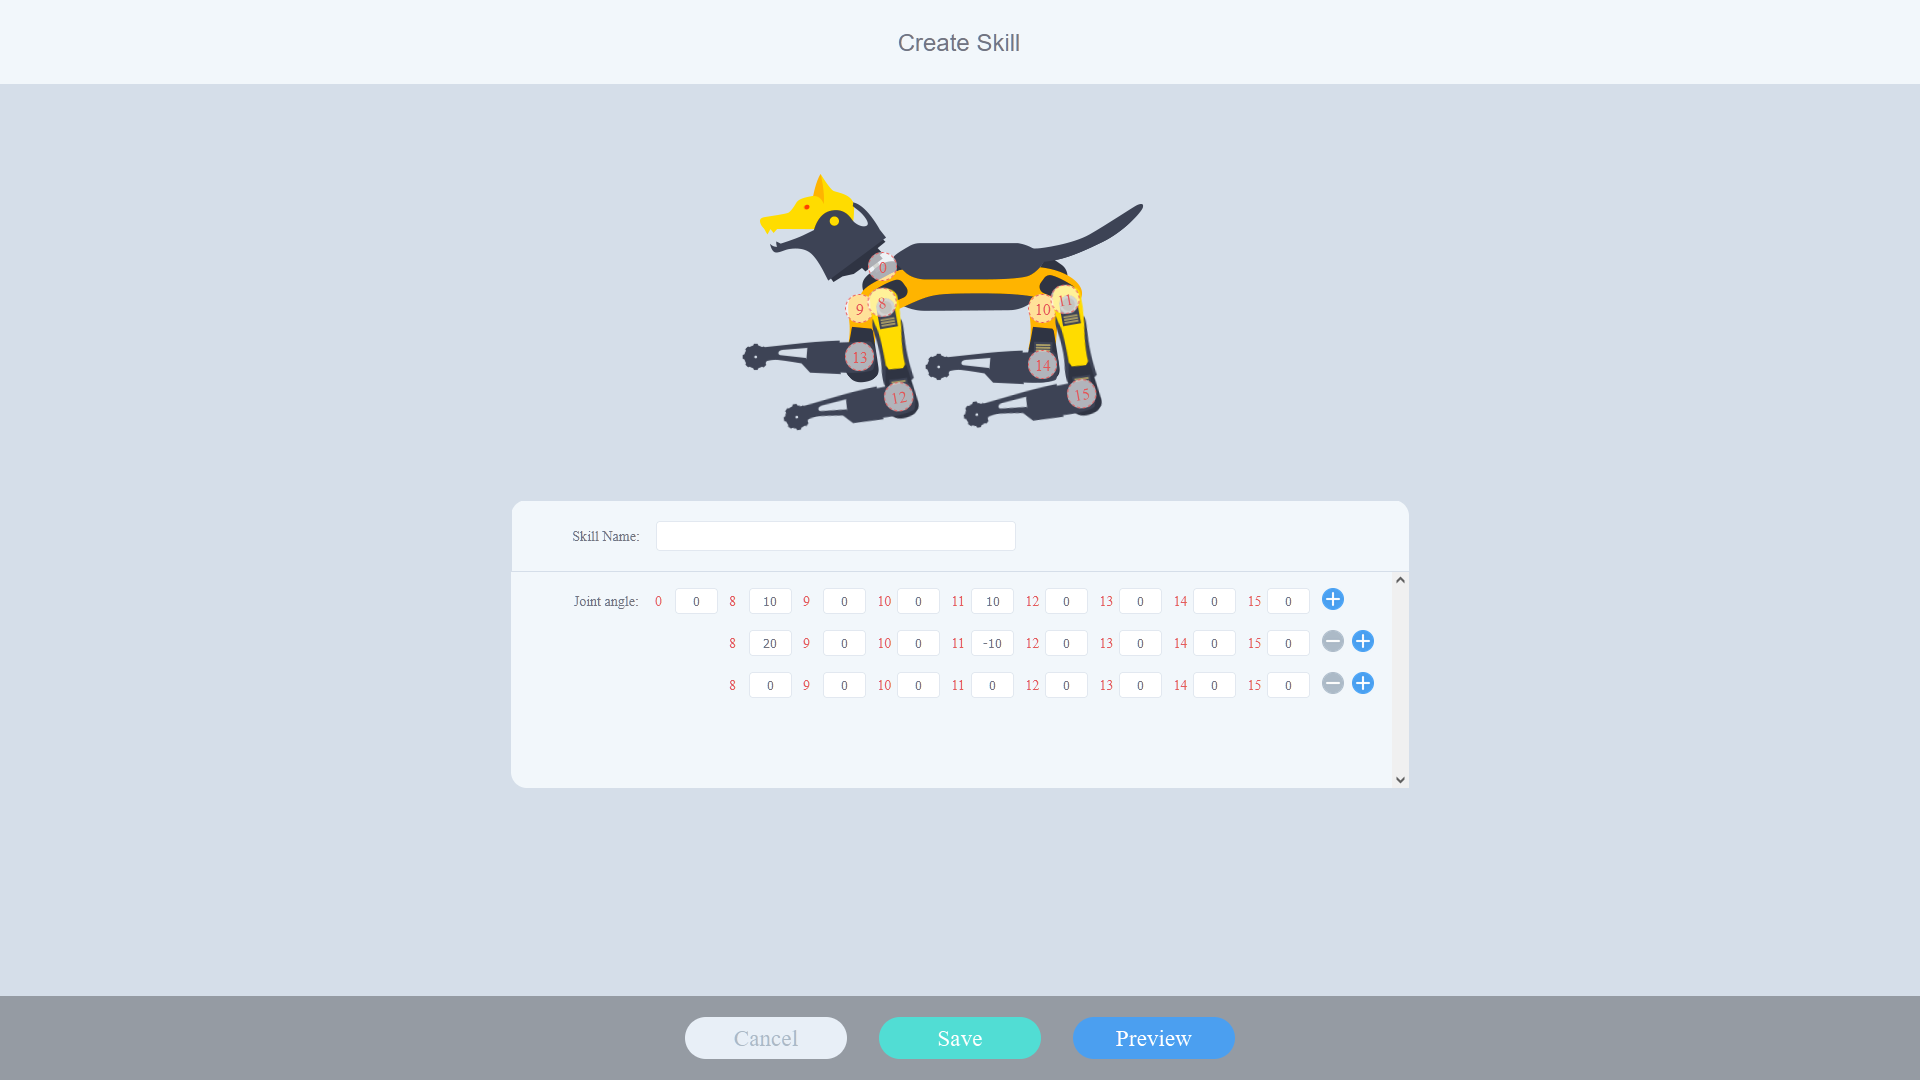
Fig. 13.10 Example: IR Remote Codecraft
13.2.5. Example Block Codes
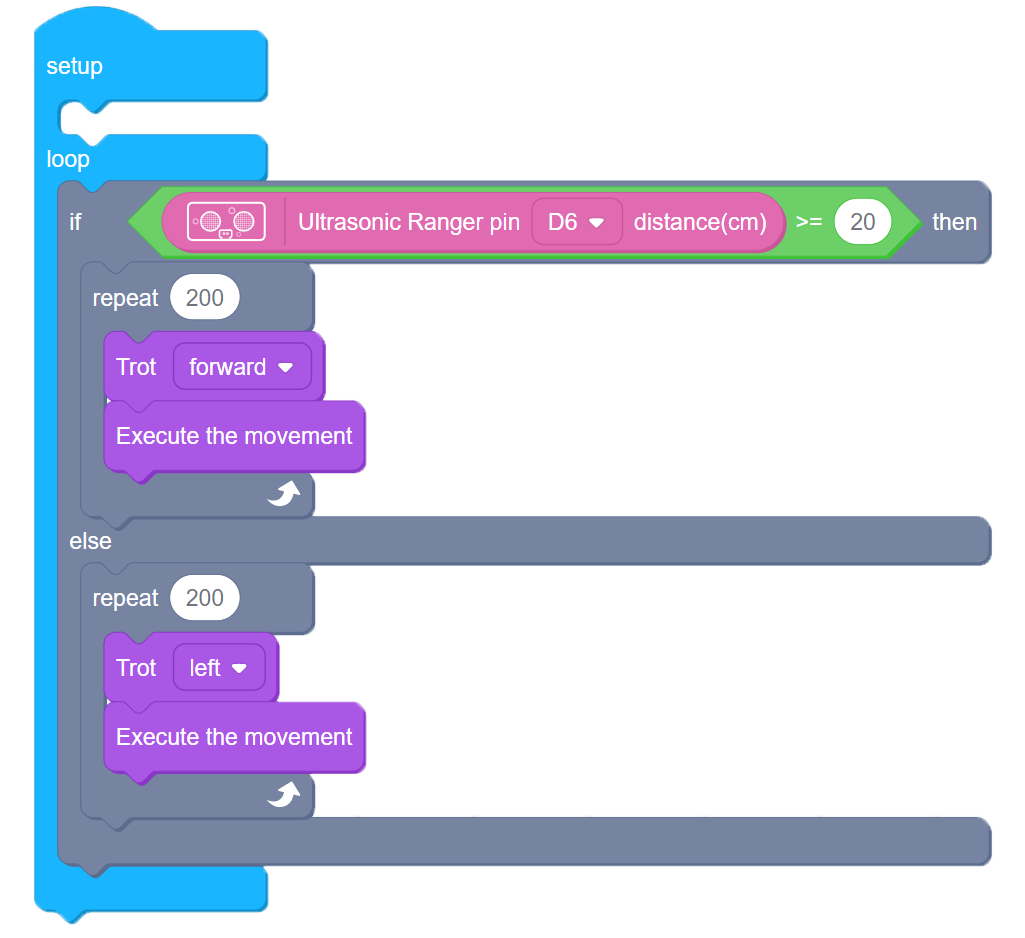
Fig. 13.11 Example: Ultrasonic Sensor Codecraft
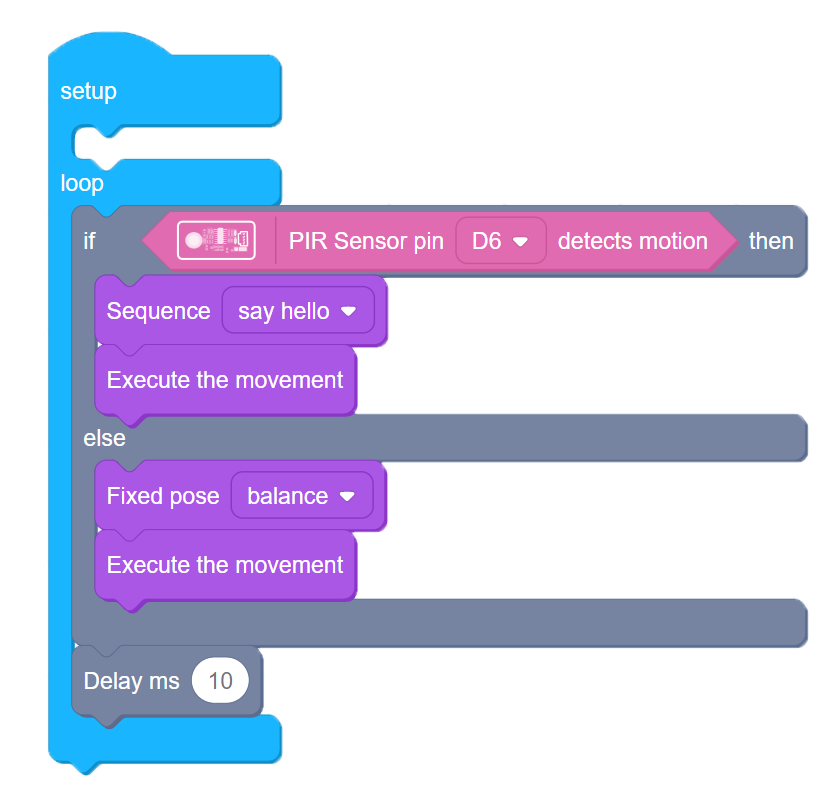
Fig. 13.12 Example: Passive infrared (PIR) Sensor Codecraft
13.2.6. References
Codecraft website https://ide.tinkergen.com/
Codecraft tutorials https://www.yuque.com/tinkergen-help-en/codecraft/overview
Codecraft Bittle tutorials https://www.yuque.com/tinkergen-help-en/bittle_course/preface